
How to Harvest Garlic: The Ultimate Guide – The Hof Garden
Garlic is one of the most rewarding crops to grow in your garden. It’s easy to plant, requires minimal maintenance, and brings a rich, savory flavor to any dish. But the key to getting the best garlic bulbs lies in knowing exactly how and when to harvest garlic. If you do it too early, the bulbs will be small and underdeveloped. If you wait too long, they may split or rot in the ground.
In this comprehensive guide, we’ll walk you through everything you need to know about harvesting garlic. From recognizing the perfect time to harvest to how to cure, clean, and store your garlic for long-term use—this article has it all.
Understanding Garlic Growth: Hardneck vs. Softneck
Before we get into harvesting, it’s important to understand the two main types of garlic:
- Hardneck Garlic: Best suited for colder climates. It produces a stiff stalk (called a scape) and typically has fewer but larger cloves.
- Softneck Garlic: Common in warmer regions. It lacks a central stalk and has more cloves per bulb, making it ideal for braiding and long-term storage.
Both types follow the same basic harvesting process, but they may mature at slightly different times.
When to Harvest Garlic: Timing is Everything
The timing of your garlic harvest is crucial. Harvesting too soon can lead to immature bulbs. Waiting too long can cause the bulbs to split or become vulnerable to disease.
Key Signs Your Garlic is Ready to Harvest
- Yellowing Leaves: The lower leaves begin to yellow and dry out, while the upper leaves remain green. Ideally, about 30–50% of the leaves should be brown and dry.
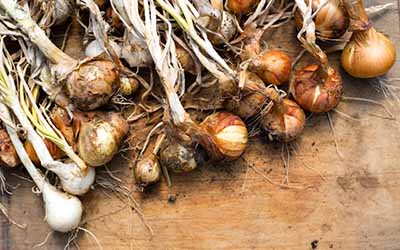
- Firm Bulbs in the Soil: Gently dig around the base of one plant to check bulb development. The cloves should feel firm and distinct.
- Paper-Like Wrapping: Fully matured garlic will have a papery skin around the bulb and cloves. This wrapper is essential for long-term storage.
Pro Tip: Start checking for maturity around 7–9 months after planting, usually in mid to late summer depending on your climate.
How to Harvest Garlic Without Damaging the Bulbs
Harvesting garlic is not difficult, but it must be done with care to avoid bruising or damaging the bulbs.
Tools You’ll Need:
- A garden fork or spade
- Gardening gloves
- A bucket or basket for collection
- Drying racks or a shaded area for curing
Step-by-Step Garlic Harvesting Process
- Loosen the Soil
Insert your garden fork about 4–6 inches away from the base of the plant. Gently rock the fork back and forth to loosen the soil. Avoid stabbing directly near the bulb. - Lift the Plant
Grab the garlic plant by the base of the stem and pull it upward while prying with your fork. Be careful not to snap the stem or tear the bulb. - Shake Off Excess Soil
Shake the plant gently to remove loose soil. Do not wash the garlic with water at this stage as moisture can encourage rot. - Handle With Care
Place the harvested bulbs in a basket or tray. Handle them gently to avoid bruising, which can affect storage life.
Curing Garlic: A Crucial Step for Long-Term Storage
Freshly harvested garlic is not ready to be stored. It must be cured—a process of drying the bulbs to reduce moisture and prevent mold or decay.
How to Cure Garlic Properly
- Choose the Right Spot
Find a dry, shaded, and well-ventilated area like a shed, garage, or covered porch. Avoid direct sunlight as it can cook the garlic and affect flavor. - Bundle or Hang
Tie the garlic in small bundles of 5–10 plants and hang them upside down by the stalks. You can also lay them flat on drying racks if space is limited. - Cure for 2–4 Weeks
Let the garlic dry completely for 2 to 4 weeks. The leaves, stems, and outer skins will become completely dry and papery. - Check for Readiness
You’ll know curing is complete when the roots are dry and brittle, and the outer skins rustle when touched.
Cleaning and Trimming After Curing
Once the curing process is complete, it’s time to clean and prep your garlic for storage.
Cleaning Steps
- Remove Excess Dirt
Gently rub off any remaining dirt with your hands or a soft brush. - Trim the Roots
Use scissors or garden snips to trim the roots close to the bulb—about ¼ inch. - Cut the Stalks (for softneck garlic)
For softneck varieties, trim the stalk to about 1 inch above the bulb. For hardneck garlic, you can remove the entire stiff stalk. - Keep the Wrapper Intact
Don’t peel off too many outer layers. The papery wrappers help protect the cloves during storage.
How to Store Garlic: Tips for Freshness and Flavor
Proper storage is key to enjoying your garlic for months to come.
Ideal Storage Conditions:
- Cool: Store garlic in a place around 60°F (15°C)
- Dark: Keep away from sunlight or bright lights
- Dry: Moisture can lead to mold and spoilage
- Ventilated: Use mesh bags, paper bags, or baskets—avoid plastic
Storage Methods
- Braiding: A traditional method for softneck garlic. It looks beautiful and allows airflow.
- Mason Jars (Without Lids): Only if stored in very dry environments.
- Garlic Keepers: Ceramic containers with ventilation holes are ideal for countertop storage.
Shelf Life: Properly cured and stored garlic can last 6–10 months, with softneck varieties typically outlasting hardneck types.
What to Do with Damaged or Small Bulbs?
Not all harvested garlic will be perfect. Here’s how to deal with the imperfect ones:
- Damaged or bruised bulbs: Use these first. They won’t store well.
- Small bulbs: These may not store long but can be used for cooking or pickling.
- Split cloves: Use quickly or plant them for your next crop.
Saving Garlic for Next Season’s Planting
If you love the variety you’ve grown, save some of your best bulbs for replanting.
How to Choose Garlic for Planting
- Select the largest and healthiest bulbs
- Choose cloves from the outer ring (they grow bigger)
- Store them in ideal conditions until planting time (usually fall)
By replanting your own garlic, you can build a strain uniquely suited to your garden’s conditions year after year.
Common Garlic Harvesting Mistakes to Avoid
Even experienced gardeners can make mistakes. Here are a few to steer clear of:
| Mistake | Why It’s a Problem |
|---|---|
| Harvesting too early | Small, underdeveloped bulbs |
| Waiting too long | Bulbs split or rot |
| Washing garlic after harvest | Increases risk of mold during curing |
| Storing in plastic bags | Traps moisture and encourages decay |
| Breaking wrappers | Reduces storage life |
Bonus: How to Use Freshly Harvested Garlic
Once your garlic is cured and stored, the fun begins! Here are a few delicious ways to use your harvest:
- Roasted Garlic Spread: Slice the tops off, drizzle with olive oil, roast, and spread on toast.
- Garlic Butter: Mix minced garlic into softened butter for steaks or bread.
- Pickled Garlic: Preserve garlic cloves in vinegar for a tangy treat.
- Infused Oils: Soak garlic in oil (store in the fridge and use within a week).
Conclusion
Harvesting garlic is a rewarding process that connects you deeply with your garden. From carefully monitoring the plants to gently lifting and curing the bulbs, each step ensures you enjoy flavorful, long-lasting garlic all year round.
By following the tips in this guide, you’ll learn exactly how to harvest garlic the right way. Whether you’re growing it for personal use, culinary experiments, or saving seeds for the next season—proper harvesting and storage make all the difference.
So grab your garden fork, head to your garlic patch, and start your harvesting journey with confidence. Your future meals will thank you!

Leave a Reply